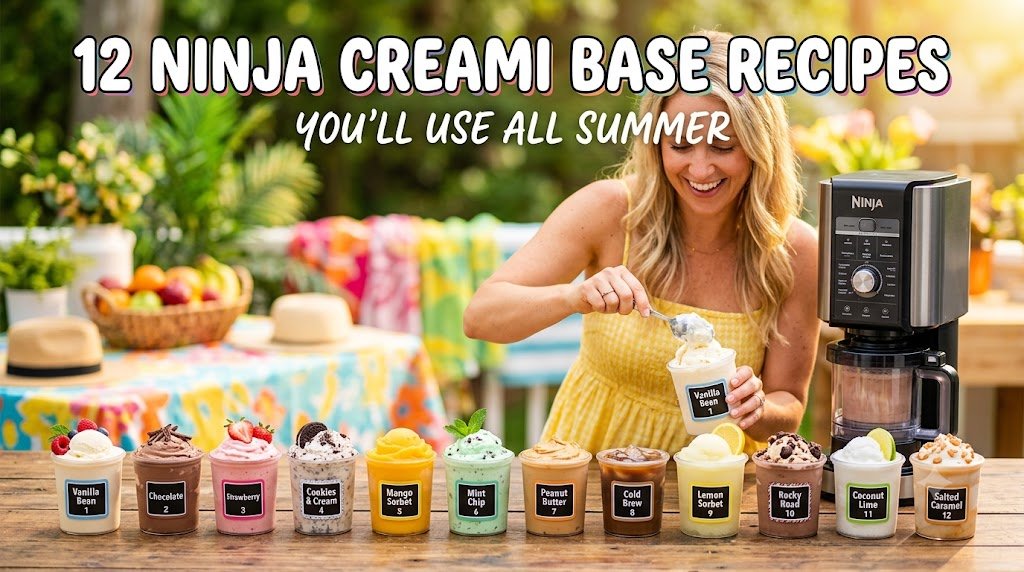
12 Ninja Creami Base Recipes You’ll Use All Summer

The Ninja Creami is one of those appliances that actually delivers — but only if your base is right.
The machine is not the hard part. The base recipe is. Too much water and you get icy, grainy ice cream. Too little fat and the texture turns chalky after processing. The wrong sweetener ratio and the frozen base won’t process smoothly. Get the base right and the machine does the rest.
Every recipe below is a complete, tested pint base — exact ingredient amounts, correct freeze time, and processing function. Twelve different flavors and styles: classic cream-based, dairy-free, high-protein, sorbet, and frozen yogurt. Every one is ready to make tonight and process tomorrow.
How the Ninja Creami Actually Works
Unlike a traditional ice cream maker that churns while freezing, the Ninja Creami freezes a solid pint first, then uses a high-speed blade to shave and re-emulsify the frozen base from the outside in. The result is ice cream with a soft, scoopable texture that comes from the processing — not from the fat content alone.
This means the rules are different from traditional recipes. Some things that would matter in a churned ice cream — like air incorporation during freezing — don’t apply here. But some things matter more: freeze time, liquid ratio, and sweetener type all have a larger impact on final texture with the Creami than they would with a standard churned base.
The Non-Negotiable Rules for Every Pint Base
- Freeze for at least 24 hours — ideally 24–48 hours. The base must be completely, uniformly solid. An underfrozen pint will not process correctly and can damage the machine.
- Fill to the max fill line — not above it. Overfilling creates processing issues and can overflow the pint.
- Do not freeze with mix-ins — add chocolate chips, fruit, cookies, or other mix-ins only after processing, using the Mix-In function.
- Let the pint sit at room temp for 5 minutes before processing — this tempers the very outer edge of the frozen base so the blade can engage cleanly without straining the motor.
- Use the correct function — Ice Cream, Sorbet, Lite Ice Cream, Gelato, and Smoothie Bowl process at different speeds and depths. Using the wrong one produces suboptimal texture.
All 12 Recipes at a Glance
| # | Recipe | Function | Style |
|---|---|---|---|
| 1 | Classic Vanilla | Ice Cream | Cream-based |
| 2 | Rich Chocolate | Ice Cream | Cream-based |
| 3 | Strawberry | Ice Cream | Cream-based |
| 4 | Vanilla Protein | Lite Ice Cream | High-protein |
| 5 | Chocolate Protein | Lite Ice Cream | High-protein |
| 6 | Mango Sorbet | Sorbet | Dairy-free |
| 7 | Strawberry Lemonade Sorbet | Sorbet | Dairy-free |
| 8 | Greek Yogurt Frozen Yogurt | Lite Ice Cream | Frozen yogurt |
| 9 | Coconut Milk Dairy-Free | Ice Cream | Dairy-free |
| 10 | Cookie Butter | Ice Cream | Cream-based |
| 11 | Peanut Butter Banana | Ice Cream | Cream-based |
| 12 | Smoothie Bowl Base | Smoothie Bowl | Dairy-free |
“The Ninja Creami is forgiving of creativity — but it is not forgiving of a bad base. Get the ratio right once and the machine does the rest every time.”

Fill, freeze 24 hours, process — the entire Ninja Creami workflow in one image.
1. Classic Vanilla Ice Cream Base
The foundation recipe. Rich, creamy, and versatile — add any mix-in after processing.
Function: Ice CreamFreeze: 24 hrs
Ingredients
- ¾ cup (180ml) heavy whipping cream
- ¾ cup (180ml) whole milk
- 3 tablespoons granulated sugar
- 1 tablespoon cream cheese, softened
- 1½ teaspoons pure vanilla extract
Instructions
- In a blender or with a whisk, combine cream cheese and sugar first until smooth and no lumps remain — this is the emulsifier step that prevents an icy texture.
- Add heavy cream, whole milk, and vanilla extract. Whisk or blend until everything is fully combined and smooth.
- Pour into a Ninja Creami pint container, filling to the max fill line. Seal and freeze for 24–48 hours until completely solid.
- Remove from freezer and let sit at room temperature for exactly 5 minutes.
- Process on the Ice Cream function. If texture looks crumbly after one spin, add 1 tablespoon of milk and run on Re-spin.
Why it works: The cream cheese acts as a stabilizer — its proteins help bind the fat and water molecules together during freezing, preventing the large ice crystals that cause a grainy texture.
2. Rich Chocolate Ice Cream Base
Deep, dark chocolate flavor using cocoa powder — no melting chocolate required, no double boiler.
Function: Ice CreamFreeze: 24 hrs
Ingredients
- ¾ cup (180ml) heavy whipping cream
- ¾ cup (180ml) whole milk
- 3 tablespoons granulated sugar
- 2 tablespoons unsweetened cocoa powder (Dutch-process preferred)
- 1 tablespoon cream cheese, softened
- 1 teaspoon vanilla extract
Instructions
- Whisk cream cheese, sugar, and cocoa powder together until a smooth paste forms. This step prevents cocoa from clumping in the liquid.
- Add heavy cream, milk, and vanilla. Whisk vigorously until cocoa is fully dissolved and no streaks remain.
- Pour into pint container to max fill line. Seal and freeze 24–48 hours.
- Temper 5 minutes at room temperature before processing.
- Process on Ice Cream function. Re-spin if crumbly with 1 tablespoon milk added.
Optional upgrade: add 1 tablespoon of espresso powder to the base — it doesn’t make chocolate ice cream taste like coffee, it makes it taste more intensely chocolatey.
3. Fresh Strawberry Ice Cream Base
Real strawberry flavor — not extract, not syrup. Blended fresh or frozen berries create a naturally pink, genuinely fruity base.
Function: Ice CreamFreeze: 24 hrs
Ingredients
- ½ cup (75g) fresh or frozen strawberries (thawed if frozen)
- ¾ cup (180ml) heavy whipping cream
- ½ cup (120ml) whole milk
- 3 tablespoons granulated sugar
- 1 tablespoon cream cheese, softened
- ½ teaspoon vanilla extract
Instructions
- Blend strawberries until completely smooth. Strain through a fine mesh sieve if you want a seedless base — optional but recommended for smoother texture.
- Whisk cream cheese and sugar together until smooth. Add strawberry purée, heavy cream, milk, and vanilla. Whisk until combined.
- Pour into pint container to max fill line. Seal and freeze 24–48 hours.
- Temper 5 minutes before processing.
- Process on Ice Cream function. Re-spin with 1 tablespoon milk if needed.

Protein bases process differently — Lite Ice Cream function is the key.
4. Vanilla Protein Ice Cream Base
High-protein, lower calorie — uses protein powder and cottage cheese for a genuinely thick, creamy result without heavy cream.
Function: Lite Ice CreamFreeze: 24 hrs
Ingredients
- 1 cup (240g) cottage cheese (full-fat for best texture)
- ½ cup (120ml) unsweetened almond milk or whole milk
- 1 scoop (30g) vanilla whey or casein protein powder
- 2 tablespoons honey or maple syrup
- 1 teaspoon vanilla extract
Instructions
- Blend all ingredients in a blender until completely smooth — cottage cheese must be fully blended with no lumps visible. About 60 seconds on high.
- Taste and adjust sweetness — protein powders vary significantly in sweetness, so start with 1.5 tablespoons honey and add more if needed.
- Pour into pint container to max fill line. Seal and freeze 24–48 hours until rock solid.
- Temper 5 minutes at room temperature.
- Process on Lite Ice Cream function. Re-spin if needed with 1–2 tablespoons of milk added to the center of the pint.
Nutrition note: This base delivers approximately 20–25g of protein per pint depending on your protein powder, with roughly 300–350 total calories.
5. Chocolate Protein Ice Cream Base
Same protein-forward approach as vanilla — but with cocoa powder and chocolate protein for a genuinely rich result.
Function: Lite Ice CreamFreeze: 24 hrs
Ingredients
- 1 cup (240g) cottage cheese, full-fat
- ½ cup (120ml) almond milk or whole milk
- 1 scoop (30g) chocolate whey or casein protein powder
- 1 tablespoon unsweetened cocoa powder
- 2 tablespoons honey or maple syrup
- ½ teaspoon vanilla extract
Instructions
- Blend all ingredients until completely smooth — at least 60 seconds. No cottage cheese lumps or cocoa streaks should be visible.
- Taste and adjust — if too bitter, add honey in small increments. If not chocolatey enough, add another half tablespoon of cocoa powder and re-blend.
- Pour into pint to max fill line. Freeze 24–48 hours.
- Temper 5 minutes. Process on Lite Ice Cream.
- Re-spin with a splash of milk if the texture is too crumbly after first processing.
🔗 More Frozen Dessert Ideas
No Ninja Creami? This no-churn peach ice cream needs zero equipment
Whip, fold, freeze — a full no-churn peach ice cream recipe that’s ready in 15 minutes of prep with no machine needed at all.
6. Mango Sorbet Base
Completely dairy-free. Pure mango flavor with the right balance of sugar to prevent it freezing rock-solid.
Function: SorbetFreeze: 24 hrs
Ingredients
- 1½ cups (250g) ripe mango chunks (fresh or frozen and thawed)
- ½ cup (120ml) water
- 3 tablespoons granulated sugar
- 1 tablespoon fresh lime juice
Instructions
- Blend mango, water, sugar, and lime juice until completely smooth. Taste — the mixture should taste slightly sweeter than you want the final product, since freezing mutes sweetness.
- Pour into pint container to max fill line. Seal and freeze 24–48 hours until completely solid.
- Temper 5 minutes at room temperature.
- Process on Sorbet function. Sorbet bases generally need one full spin and rarely need re-spinning.
Key ratio note: Sorbet needs more sugar than you’d expect — the sugar acts as an anti-freeze agent, keeping the texture scoopable rather than solid ice. Do not reduce sugar below 3 tablespoons or the sorbet will process too hard.
7. Strawberry Lemonade Sorbet Base
Bright, tart, and refreshing — one of the best summer Creami recipes full stop. No dairy, no fat, just pure fruit flavor.
Function: SorbetFreeze: 24 hrs
Ingredients
- 1 cup (150g) fresh or frozen strawberries
- ½ cup (120ml) fresh lemonade (or ½ cup water + 3 tablespoons lemon juice)
- 3 tablespoons granulated sugar
- Zest of 1 lemon
Instructions
- Blend all ingredients until smooth. Strain through a fine mesh sieve to remove strawberry seeds for a silkier texture — optional but worth it for this recipe.
- Taste: it should be brighter and slightly sweeter than you want the final result.
- Pour to max fill line. Freeze 24–48 hours.
- Temper 5 minutes. Process on Sorbet function.
8. Greek Yogurt Frozen Yogurt Base
Tangy, creamy, and lighter than full ice cream — use full-fat Greek yogurt for a texture that actually processes well.
Function: Lite Ice CreamFreeze: 24 hrs
Ingredients
- 1 cup (240g) full-fat plain Greek yogurt
- ½ cup (120ml) whole milk
- 3 tablespoons honey or maple syrup
- 1 teaspoon vanilla extract
Instructions
- Whisk Greek yogurt, milk, honey, and vanilla together until smooth and well combined.
- Pour into pint container to max fill line. Seal and freeze 24–48 hours.
- Temper 5 minutes. Process on Lite Ice Cream function.
- If texture is icy or crumbly, add 2 tablespoons of milk and re-spin. Greek yogurt bases occasionally need 2 spins for optimal smoothness.

Coconut milk creates one of the richest dairy-free bases — the fat content rivals heavy cream.
9. Coconut Milk Dairy-Free Base
Full-fat canned coconut milk produces a base so rich it rivals a cream-based version — completely vegan, no compromise on texture.
Function: Ice CreamFreeze: 24 hrs
Ingredients
- 1 can (400ml) full-fat coconut milk, well shaken
- 3 tablespoons granulated sugar or maple syrup
- 1½ teaspoons vanilla extract
- Pinch of salt
Instructions
- Whisk coconut milk, sugar, vanilla, and salt until the sugar fully dissolves — about 1 minute. Do not use light coconut milk; the fat is what creates the creamy texture.
- Pour into pint container to max fill line. Shake gently to even out. Freeze 24–48 hours.
- Temper 5 minutes.
- Process on Ice Cream function. This base typically processes very smoothly in one spin.
10. Cookie Butter Ice Cream Base
Speculoos cookie spread blended into a cream base — caramelized, spiced, and deeply addictive.
Function: Ice CreamFreeze: 24 hrs
Ingredients
- ¾ cup (180ml) heavy whipping cream
- ¾ cup (180ml) whole milk
- 3 tablespoons cookie butter (Biscoff or Trader Joe’s Speculoos)
- 2 tablespoons granulated sugar
- 1 tablespoon cream cheese, softened
- ½ teaspoon vanilla extract
Instructions
- Blend cream cheese, cookie butter, and sugar until smooth and paste-like.
- Add heavy cream, milk, and vanilla. Blend until fully combined with no streaks of cookie butter remaining.
- Pour to max fill line. Freeze 24–48 hours.
- Temper 5 minutes. Process on Ice Cream function. After processing, add crushed speculoos cookies as mix-ins using the Mix-In function for extra crunch.
11. Peanut Butter Banana Ice Cream Base
Ripe banana acts as both sweetener and thickener — with peanut butter folded in, this tastes like a frozen PB&B sandwich.
Function: Ice CreamFreeze: 24 hrs
Ingredients
- 1 very ripe banana (the riper the sweeter — black spots are ideal)
- 2 tablespoons natural peanut butter (no added sugar)
- ¾ cup (180ml) whole milk
- ½ cup (120ml) heavy whipping cream
- 2 tablespoons granulated sugar
- ½ teaspoon vanilla extract
Instructions
- Blend banana, peanut butter, milk, cream, sugar, and vanilla until completely smooth. The banana should be fully incorporated with no chunks.
- Taste — the banana flavour will be more prominent after freezing, so this is a good level at this stage.
- Pour to max fill line. Freeze 24–48 hours.
- Temper 5 minutes. Process on Ice Cream. Re-spin if crumbly with 1 tablespoon of milk.
12. Berry Smoothie Bowl Base
Not ice cream — a thick, soft, scoopable smoothie bowl processed to a texture between sorbet and a traditional smoothie bowl. Add granola and fresh fruit on top.
Function: Smoothie BowlFreeze: 24 hrs
Ingredients
- 1 cup (150g) frozen mixed berries (blueberry, raspberry, strawberry)
- ½ cup (120ml) coconut water or apple juice
- ½ banana, sliced
- 1 tablespoon honey
Instructions
- Blend all ingredients until smooth — the mixture will be thick and deeply colored.
- Pour into pint container to max fill line. Freeze 24–48 hours until solid.
- Temper 5 minutes.
- Process on Smoothie Bowl function — this produces a softer, scoopable texture specifically suited for bowl serving. Do not use Ice Cream function for this base. Serve immediately in a bowl topped with granola, sliced banana, and fresh berries.

The Smoothie Bowl function produces a softer texture — serve immediately before it hardens.
Ninja Creami Troubleshooting Guide
Same recipe, different results every time? Most problems come from one of these causes.
| Problem | Likely Cause | Fix |
|---|---|---|
| Icy / grainy texture | Not enough fat or sugar | Add cream cheese, increase fat ratio |
| Crumbly after processing | Too frozen / needs more liquid | Add 1 tbsp milk, run Re-spin |
| Motor straining loudly | Not tempered long enough | Stop, let sit 5 more min, retry |
| Liquid pooling on top | Overfilled past max line | Always fill to max line only |
| Too sweet after processing | Wrong sweetener ratio | Reduce sugar by ½ tbsp next time |
| Not sweet enough | Freezing mutes sweetness | Taste base before freezing — it should seem slightly too sweet |
⭐ Key Takeaways
- Freeze for the full 24–48 hours. An underfrozen pint produces poor texture and strains the machine.
- Cream cheese is the stabilizer in cream-based recipes — never skip it. It prevents the large ice crystals that make ice cream grainy.
- Use the correct function — Sorbet, Lite Ice Cream, Ice Cream, and Smoothie Bowl produce different textures. They are not interchangeable.
- Always temper 5 minutes before processing — this prevents the motor from straining on the first pass.
- Crumbly texture is fixed with Re-spin after adding 1 tablespoon of liquid to the pint center — this is normal and not a failure.
- Taste before freezing — the mixture should taste noticeably sweeter than you want the final product since freezing mutes sweetness significantly.
- The protein bases require a blender — cottage cheese must be fully smooth before freezing or the texture will be lumpy after processing.
Conclusion: The Base Is the Recipe
The Ninja Creami makes the execution easy. What it cannot fix is a base with the wrong ratios. Every recipe above has been built around the specific requirements of the machine — the right fat-to-liquid ratio, the right sugar concentration, the right function, and the correct freeze time.
Start with the Classic Vanilla. Make it twice to understand how the machine behaves with a well-built cream base. Then move to whichever flavor catches your interest — the protein bases if you’re tracking macros, the sorbets if you want something dairy-free and lighter, the coconut base if you’re vegan, or the Cookie Butter and Peanut Butter Banana if you just want something genuinely indulgent without any pretense of health.
All twelve are worth the 10 minutes of prep and the 24 hours of patience. That wait is the only hard part.
“The best ice cream you’ve ever made is one correct base recipe and twenty-four hours away.”
Frequently Asked Questions

My name is Hamza Waheed, and I am an SEO expert with over 7+ years of experience in search engine optimization and the keto blogging industry. I specialize in creating SEO-driven content focused on keto recipes, low-carb living, and organic traffic growth. I combine technical SEO skills with practical health and nutrition content to deliver useful and engaging information for readers.